Generating the Osano consent manager code
Creating a consent management implementation is simple and takes just a few minutes. Navigate to the "Consent Management" tab in Osano, and create a new configuration. In the configuration settings, add the following:
- A name (unique identifier - internal use only)

-
The root domain that your website is hosted on.
-
- Ex. If you own example.com, but your website is hosted on www.example.com, you will want to enter only example.com. Osano automatically works with subdomains of your website with no additional configuration.

- Policy Link Text - The text displayed on the cookie popup that links the customer to one of the following policies:
- Cookie Notice, Cookie Policy, Data Storage Policy, Privacy Notice, Privacy Policy.

- Policy Link URL - The URL link to the aforementioned policy.
-
- Any additional settings
- Global Privacy Control
- When enabled, end users using a GPC compatible browser or browser extension will have any GPC signals respected. When off, GPC signals will be ignored. [For more information, see Global Privacy Control (GPC).]
- Global Privacy Control
-
- IAB EU TCF 2.0 (Enterprise Only)
- When enabled, this switch changes all cookie popups in the EU to IAB-defined and compliant popups. [For more information, see Osano and the IAB Framework .]
-
IAB US Privacy String Notice Confirmation
- By enabling this toggle, Customer is confirming that they have provided consumer notice and Do Not Sell or Share links under applicable regulations and laws. Enabling this toggle will result in a Y being sent in the second character position of the IAB US Privacy string.
- IAB EU TCF 2.0 (Enterprise Only)
-
- Google Consent Mode
- When enabled, this switch will allow the Osano CMP to interact with Google Consent Mode (beta). [For more information, see Google Consent Mode.]
- Google Consent Mode
-
- Legacy Browser Support
- When turned ON, Osano will generate an osano.js that supports legacy browsers and modern browsers. When OFF, Osano will generate an osano.js that only supports modern browsers. [For more information, see Legacy Browser Support.]
- Legacy Browser Support
-
- Curated Block List
- When enabled, Osano will automatically block specific scripts and cookies in regions where their usage has been declared illegal by legislation. When off, Osano will respect existing classification settings. [For more information, see Block List.]
- Curated Block List
-
- First Layer Categories (Business+, Enterprise)
- By default, Osano utilizes a popup containing all opt-in categories for users accessing from the EU and other select locales. When disabled, this option counteracts this setting and turns the popup into a "Manage Preferences" popup. [For more information, see First Layer Categories | Manage Preferences .]
-
Add Manage Preferences Button
-
When enabled, a Manage Preferences button will be present on banner templates: 1 and 3. When disabled, banner templates 1 and 3 will have no Manage Preferences button.
-
- First Layer Categories (Business+, Enterprise)
-
- US State Level Legislation Opt-Out Banner Format (Enterprise Only)
- By default, Osano utilizes an Opt-In dialog for users accessing from California, Colorado, Connecticut, and Virginia. When enabled, this option counteracts this setting and turns the opt-in dialog into an opt-out. This option is compliant with US state level legislation. [For more information, see US State Level Legislation Opt-Out Banner Format.]
- Cross-Domain (Enterprise Only)
- When enabled you have the option to add multiple domains into your configuration settings, which enable initial consents to be shared across unrelated domains owned by the same entity. Simply add a domain, "tab," and add additional domains. (Some domain restrictions apply). [For more information, see Cross-Domain Support .]
- US State Level Legislation Opt-Out Banner Format (Enterprise Only)
- Click "Create Configuration." The "Create Configuration" button text will change to "Publish."

- Click "Publish." A publishing modal will pop up.

- When prompted, select "Clear and Publish" and then click "Publish"
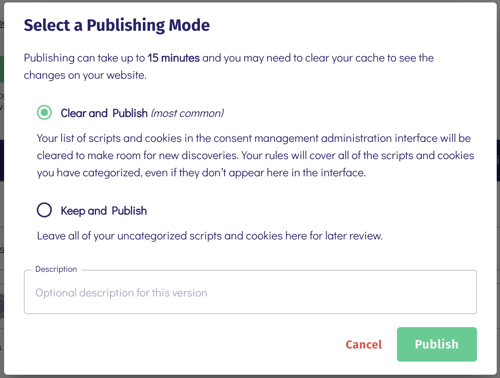
- Once the publish has been completed, the "Get Code" button will activate and become clickable. Click "Get Code" to access the osano.js script link, which generates the consent manager for your site.

Continue to Installing Osano for instructions on adding the osano.js to your site.